Nut Welding Electrodes: Covers, Holders, and How They Fit Together

Projection nut welding — fusing a weld nut to a sheet through the nut’s projections — depends on an electrode assembly that does three things at once: it locates the nut precisely, it delivers current and force to collapse the projections, and it lets you replace the wear parts without scrapping the whole tool. That assembly is a small system: a nut electrode body, a replaceable electrode cover (or head) that takes the wear, and a locating pin that centers the nut on its hole. Get the assembly right — the correct material, a cover you can swap, a pin that locates accurately, and cooling to survive the duty — and nut welding is fast, strong, and consistent. Get it wrong and you fight misaligned nuts, weak welds, and constant downtime. This guide explains the parts, how they fit together, how to select them, and how to keep them working.
Nut welding has its own failure modes we’ve covered separately — our article on why nut welding electrodes stick goes deep on sticking — and the material logic is the familiar copper-alloy story from our CuCrZr vs pure copper comparison. Here the focus is the electrode assembly as hardware.
The Nut Welding Electrode Assembly: Three Parts, One Job
A nut welding electrode isn’t a single solid piece — it’s an assembly designed so the wear part can be replaced and the nut can be located. Understanding the three parts is the foundation for selecting and maintaining them.
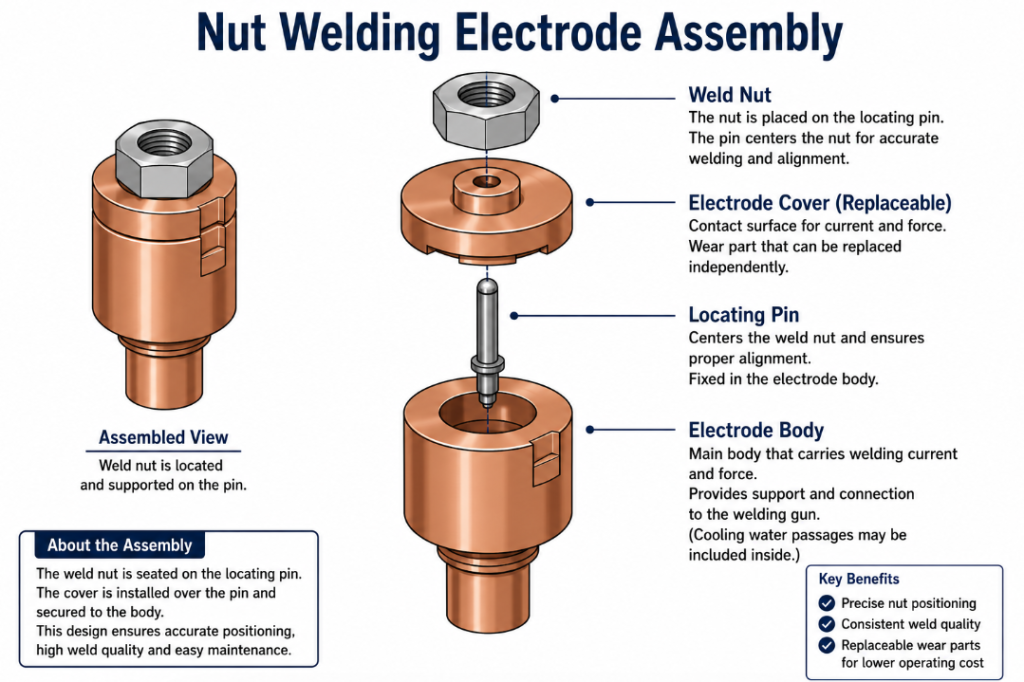
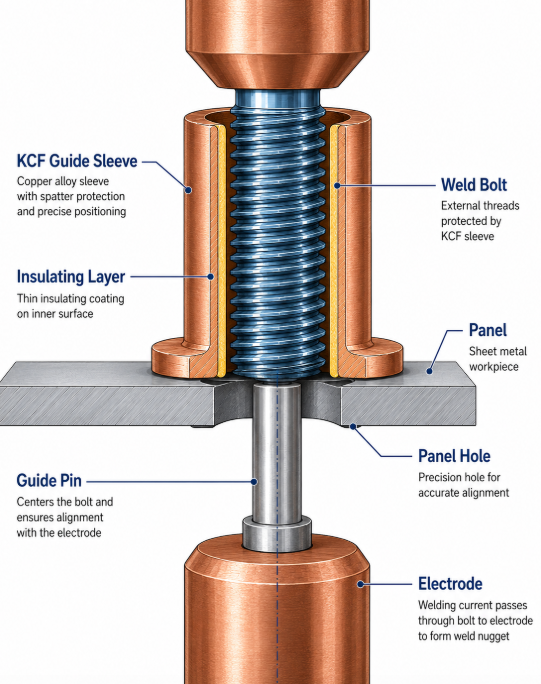
The nut electrode body. The main electrode that carries current and force to the nut, and the structural base the other parts mount to. It’s the durable foundation of the assembly, made to last while the wear parts are swapped around it.
The electrode cover (replaceable head). The part that actually contacts the nut and takes the wear — and it’s replaceable by design. As the contact face degrades from the heat, pressure, and sticking of nut welding, you replace the cover rather than the whole electrode, which is what keeps nut welding economical. Industry nut-welding systems are built exactly this way, with electrode bodies and replaceable heads plus insulated pins or inserts supplied in standard dimensions — the replaceable head is a defining feature of a well-designed nut electrode.
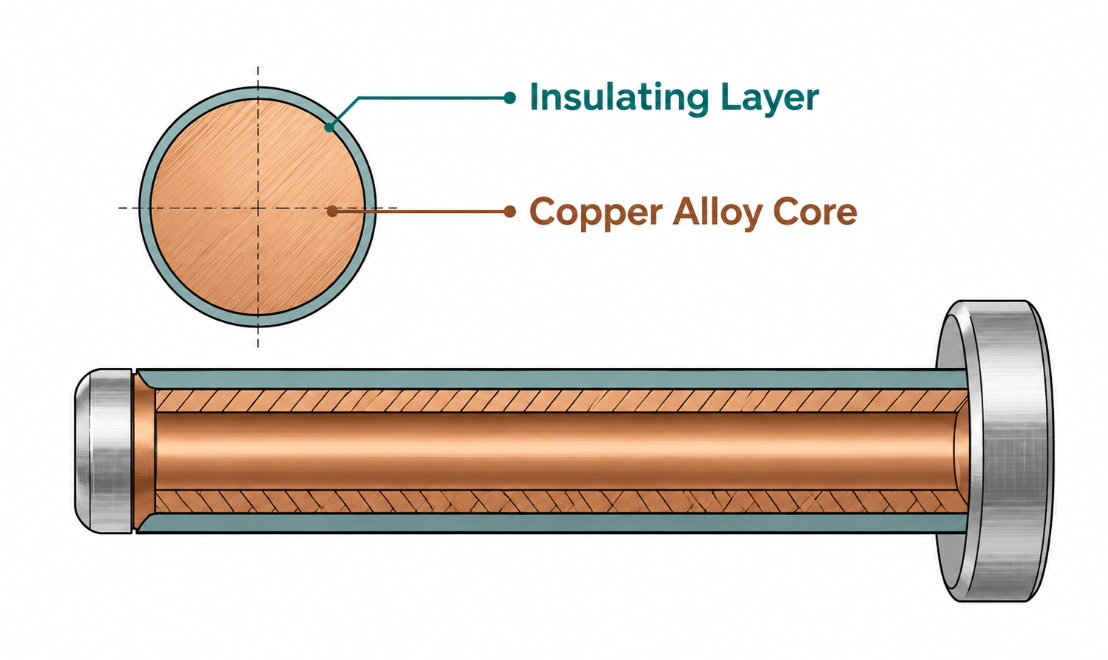
The locating pin (guide pin). A pin — often through the electrode — that passes through the nut’s thread and the sheet’s hole to center the nut precisely over its hole before welding. This pin is what makes the nut land in the right place, square and centered, so the weld goes where it should. In many designs the pin is insulated (this is where KCF guide pins come in, keeping the pin from shunting current), and its accuracy directly governs how precisely the nut is positioned.
Together these three do the whole job: the body delivers current and force, the cover takes the wear and is replaced when spent, and the pin locates the nut. The design insight is that the parts that wear (cover) and the parts that locate (pin) are separable from the part that lasts (body) — so you maintain the assembly by replacing wear parts, not whole electrodes.
Table 1 — The Nut Welding Electrode Assembly
| Part | Job | Wear / Replace |
|---|---|---|
| Electrode body | Carries current & force; structural base | Durable — lasts |
| Electrode cover (head) | Contacts the nut; takes the wear | Replaceable — swap when worn |
| Locating pin | Centers the nut on its hole | Wears; affects accuracy |
The right-hand column is the maintenance logic in miniature: the cover and pin are consumable and serviceable, the body endures. A good assembly is built around that separation.
How the Assembly Welds a Nut
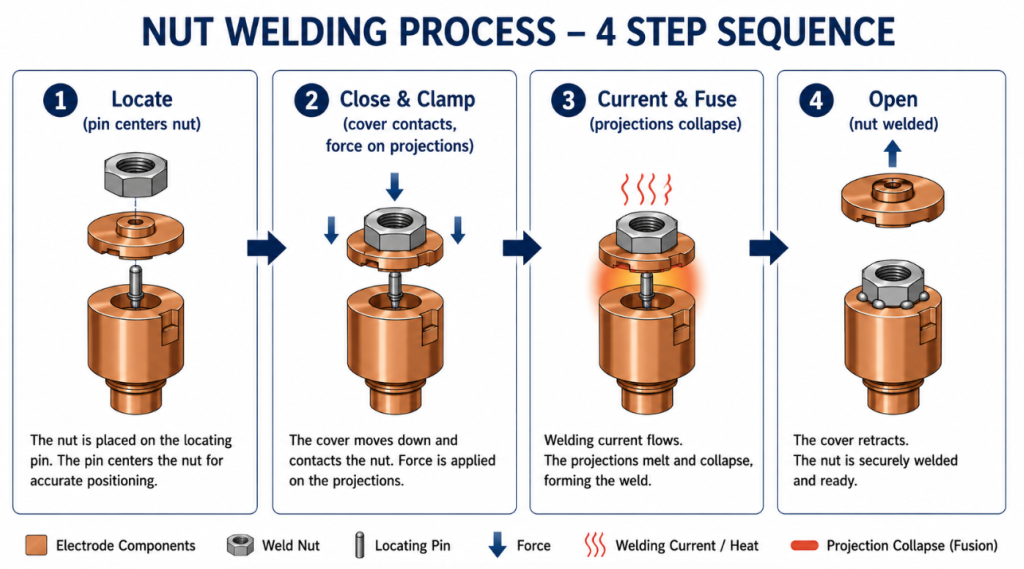
Seeing how the parts work together in a weld clarifies why each matters. Projection nut welding proceeds in a clear sequence, and the assembly serves it at every step.
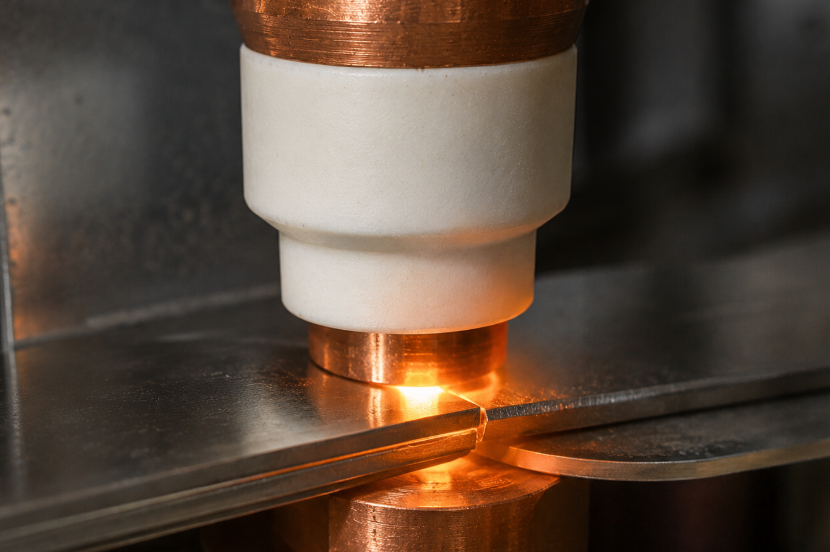
First, the nut is placed and located: the locating pin passes through the nut’s thread and the sheet’s hole, centering the nut on its position. This is the pin’s moment — accurate location here is what puts the weld in the right place. Next, the electrodes close, and the cover contacts the nut while the body brings up force, clamping the nut’s projections against the sheet. Then current flows, constricted through the projections where the resistance concentrates heat — in projection welding, the current is focused at the projections rather than spread across a flat cap face. The heated projections soften, the electrode force collapses them, and fusion forms the weld. Finally the electrodes open, leaving the nut welded, and the assembly is ready for the next cycle.
The whole sequence depends on the assembly doing its parts: if the pin doesn’t locate accurately, the nut is off-position; if the cover doesn’t contact evenly, force and current are uneven; if the body doesn’t deliver clean force and current, the projections don’t collapse right. Each part has a role in each weld, and a weakness in any one shows up in the weld. This is also why nut welding is so sensitive to the condition of the assembly: unlike a simple spot weld where one cap does everything, a nut weld distributes the work across three parts, and the weld is only as good as the weakest of them on that cycle.
Selecting a Nut Welding Electrode
Selection comes down to five considerations, each tied to the assembly and its duty.
CuCrZr material. The body and contact face benefit from CuCrZr’s balance of electrical conductivity, hardness, and heat resistance — the same reasons it’s the workhorse for spot electrodes apply to nut welding, where the electrode must pass current efficiently and resist the deformation that heat and force cause. It’s the sensible default material for the conductive parts of the assembly.
A replaceable, well-designed cover. Because the cover takes the wear, a design where it’s easily replaceable is central — you want to swap the wear part quickly and cheaply, not replace the whole electrode. A good cover design protects the body and is simple to change, minimizing both cost and downtime as the contact face wears.
Matched to the nut size (M4–M12 and beyond). The assembly has to match the specific nut — its size and thread (M4, M6, M8, M10, M12, and others) — so the locating pin fits the thread and the geometry suits the nut. An electrode matched to your nut size locates and welds it correctly; a mismatch can’t. This is a first-order specification.
Cooling. Nut welding generates heat, and the electrodes and holders benefit from cooling to hold up — water cooling of the electrode assembly helps it survive the duty and last, and welding systems commonly specify water-cooled electrodes and holders for exactly this reason. Cooling provision belongs in the specification, not as an afterthought.
Customization to drawing. Nut electrode assemblies frequently need to match a specific nut, machine, and setup — so made-to-drawing capability matters. We machine nut welding electrodes to customer specifications and drawings, because the assembly has to fit your nut and your welder, and a machinable copper alloy makes that practical.
Table 2 — Nut Welding Electrode Selection Factors
| Factor | Why It Matters | Getting It Wrong Means |
|---|---|---|
| CuCrZr material | Conductivity, hardness, heat resistance | Soft face, fast wear |
| Replaceable cover | Swap wear part, not whole electrode | Costly, slow maintenance |
| Matched to nut size | Pin and geometry fit the nut | Can’t locate/weld correctly |
| Cooling | Survives the welding heat | Overheating, short life |
| Custom to drawing | Fits your nut, machine, setup | Doesn’t fit the application |
The five rows are a specification checklist: an inquiry that answers all five is one we can build correctly for your nut and your line the first time.
The Problems Customers Run Into
Nut welding electrode problems cluster around the assembly’s functions — locating, welding, and wearing — and each traces back to a part.
Nut misalignment or skewing. When the nut lands off-position or crooked, the weld is misplaced and quality suffers. This usually traces to the locating pin — a worn, damaged, or ill-fitting pin doesn’t center the nut accurately, so the nut sits off its hole. Location is the pin’s job, and misalignment points there first.
Weak or under-strength nut welds. When the weld doesn’t hold, the causes span the assembly: uneven cover contact (so force and current aren’t even across the projections), inadequate force or current from the setup, or a degraded contact face. Even projection contact is essential — the electrode faces need to apply force evenly to all the nut’s projections, and an uneven or worn cover undermines that.
Locating pin wear degrading accuracy. The pin wears with use, and as it does, its locating accuracy drifts — the nut is centered less precisely over time. Because the pin is a wear part, this is expected, and it’s why the pin is replaceable; the fix is to renew the pin before its wear shows up as misalignment.
Electrode cover wear and sticking. The cover takes the brunt of nut welding’s heat, pressure, and sticking tendency, so it wears and needs replacement — that’s its designed role. Sticking (which our dedicated article covers in depth) accelerates cover wear, and a worn cover contacts unevenly, feeding back into weak welds. Replacing the cover on schedule keeps the contact clean and even.
Table 3 — Nut Welding Problems: Cause and Fix
| Problem | Likely Cause | Fix |
|---|---|---|
| Nut misaligned / skewed | Worn or ill-fitting locating pin | Renew/refit the pin |
| Weak welds | Uneven cover contact, force/current, worn face | Replace cover; check setup |
| Accuracy drifting | Locating pin wear | Replace pin before misalignment shows |
| Cover wear / sticking | Normal duty; sticking accelerates it | Replace cover on schedule |
The fixes are mostly “replace the right wear part” — which is exactly what the assembly is designed to allow. Misalignment means the pin; weak welds and sticking mean the cover; the body endures through both.
Maintaining Nut Welding Electrodes
Maintenance follows directly from the assembly’s design: keep the wear parts fresh and the locating accurate.
Replace the cover before it degrades the weld. The cover is a wear part — replace it on a schedule driven by its duty, before its worn or alloyed face starts producing weak or inconsistent welds. Replacing it early, like dressing a spot cap early, costs less than the defects a worn cover allows. This is the single most routine nut-electrode maintenance action.
Renew the locating pin to hold accuracy. The pin’s accuracy is the nut’s positioning — renew the pin before its wear translates into misaligned nuts. Watch for the first signs of positioning drift and treat them as a pin signal.
Keep the cooling working. As with any resistance welding electrode, verify the cooling actually works — nut electrodes and holders that run hot degrade and stick faster. The invisible cooling failures we covered elsewhere apply here too.
Keep contact even and clean. Ensure the cover contacts the nut’s projections evenly and the surfaces are clean — even, clean contact is what distributes force and current correctly across the projections for a sound weld.
Real Cases: Nut Electrode Assemblies Matched and Improved
Case 1 — Locating optimized to improve accuracy. A customer struggling with nut positioning accuracy needed a better locating solution. Optimizing the locating pin and centering improved how precisely nuts were positioned, resolving the misalignment. Accuracy came from getting the locating right — the pin’s job, done well.
Case 2 — Electrode machined to the nut and drawing. A customer needed nut welding electrodes matched to their specific nut and specification. We machined the assembly to their drawing, delivering electrodes that fit their nut size and setup. Made-to-drawing capability is much of what nut electrode supply is, because nuts and machines vary so widely.
Case 3 — Cover design improved life. A customer getting short life from their electrode covers benefited from an improved cover design — one that better withstood the duty and was straightforward to replace, extending useful life and easing maintenance. The wear part, designed well, lasted longer and cost less to maintain.
Build the Assembly Around the Job
A nut welding electrode is an assembly, and welding nuts well comes from getting the assembly right: a CuCrZr body that delivers current and force, a replaceable cover that takes the wear and swaps out easily, a locating pin that centers the nut accurately, cooling to survive the duty, and the whole thing matched — or made — to your nut and machine. The problems that plague nut welding trace to specific parts: misalignment to the pin, weak welds and sticking to the cover — and the fixes are the replaceable-part maintenance the assembly is designed to allow. Build around the job and nut welding is fast, strong, and consistent.
If you weld nuts, tell us your nut sizes and threads, your machine and setup, and any drawing you have, and we’ll supply nut welding electrode assemblies — bodies, replaceable covers, and locating pins — matched to your application in CuCrZr with proper cooling. See our CuCrZr nut electrode cover and holder, browse our copper spot welding electrodes range, or send your nut spec and let’s get your nut welding running right.
References
Electroweld — Projection Welder for Weld Nuts, Bolts and Studs (water-cooled electrodes and holders): https://www.electroweld.com/products/electroweld-projection-welder-for-weld-nuts-weld-bolts-and-weld-studs-sp-50pr
Tuffaloy / TJ Snow — Nut & Stud Welding Electrodes (bodies, replaceable heads, insulated pins): https://tjsnow.com/resistance-welding-supplies/tuffaloy-resistance-welding-products/nut-stud-welding/
The Fabricator — Projection Welding for Nut and Bolt Attachment: https://www.thefabricator.com/thefabricator/article/shopmanagement/projection-welding-for-nut-and-bolt-attachment
Share This Article
Latest Articles
October 20, 2026
October 20, 2026
October 20, 2026
October 20, 2026
October 20, 2026
October 20, 2026
October 20, 2026
October 20, 2026