Common Spot Welding Defects: Causes and How to Fix Them

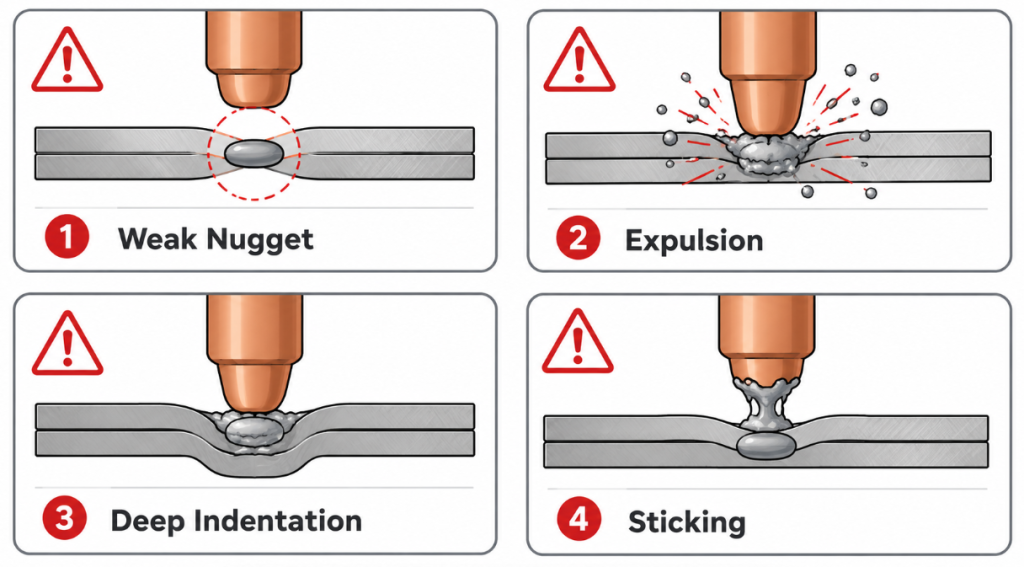
When a spot weld goes wrong, it usually goes wrong in one of a handful of recognizable ways — a nugget too small to hold, molten metal spraying out as expulsion, an indentation crushed too deep into the part, or an electrode that sticks to the work. Each defect looks different, but they share a common anatomy: heat generated in the wrong place, at the wrong rate, or inconsistently. That means each defect points back to a short list of root causes, and diagnosing which one you’re dealing with is how you fix the problem instead of just fighting the symptom. This article walks through the four most common spot welding defects, what causes each, and how to trace and fix them — drawing on what we see when customers bring us their weld problems.
Because so many defects trace back to the electrode and its condition, this article connects to much of what we’ve written about electrodes — from why electrodes wear out to cooling and mushrooming. Think of this as the diagnostic map that ties those threads together from the defect side.
The Six Drivers Behind Almost Every Defect
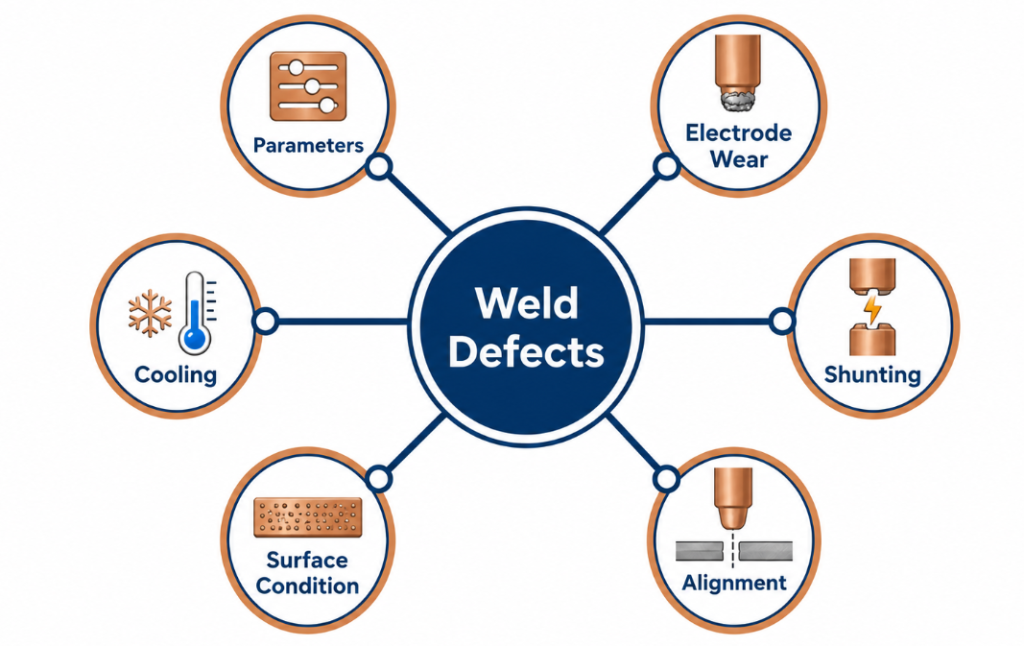
Before the defects themselves, it helps to know the short list of root causes, because nearly every spot welding defect traces to one or more of six drivers. Industry troubleshooting frames it the same way: most weld defects result from heat generated in the wrong place, at the wrong rate, or with poor repeatability, and that comes back to current, time, force, contact condition, electrode state, and cooling.
In the field, we trace customer defects to these six again and again:
Wrong parameters (current, time, force). Too little heat gives weak welds; too much gives expulsion and indentation; wrong force disturbs both contact and containment.
Electrode wear and mushrooming. As the electrode face spreads, current density drops — the same current over a bigger face means less concentrated heat, and the weld starves. A mushroomed electrode quietly changes the process without anyone touching a setting.
Insufficient cooling. An overheated electrode softens, deforms faster, and destabilizes the process — the cooling problems we covered in depth in our cooling article feed directly into defects.
Shunting (insulation failure). When current finds a path around the joint — through a conductive locating part or a nearby weld — the joint itself gets less current than intended, and the weld comes out weak while looking normal.
Workpiece surface condition. Coatings, oil, rust, and scale change the contact resistance where the weld forms, shifting where heat is generated and making results inconsistent.
Misalignment and positioning. Electrodes or parts out of line concentrate force and current unevenly, producing off-center, distorted, or inconsistent welds. This driver is easy to underestimate because it hides behind the others: a misaligned electrode pair wears unevenly (so it looks like a wear problem), loads one edge of the joint (so welds vary in ways that look like parameter instability), and in fastener welding, a positioning error puts the whole weld in the wrong place regardless of how good every other factor is. Alignment deserves a check whenever welds are inconsistent in a way parameters can’t explain — especially after any gun maintenance, electrode change, or fixture adjustment, which is exactly when alignment silently shifts.
Hold these six in mind — every defect below is some combination of them showing up at the weld.
Defect 1: Weak Welds / Undersized Nuggets
The most dangerous defect, because it hides. An undersized nugget looks like a weld — the parts are joined, the surface may look fine — but the fused zone is too small to carry the load, and the joint fails in service or in testing. Undersized nuggets are widely regarded as a leading cause of field failures, commonly linked to low current, short weld time, improper force, poor electrode geometry, and current shunting.
What causes it:
- Too little heat input — current too low or weld time too short for the joint.
- Excessive force — pressing too hard spreads the contact and lowers resistance, so less heat forms where the nugget should grow.
- Electrode mushrooming — the face has spread, current density has dropped, and yesterday’s good parameters now under-weld. This is the classic silent drift; our deep dive on electrode mushrooming covers the mechanism.
- Shunting — current leaking around the joint through a conductive path, so the joint never receives full current. This is exactly why locating parts must insulate, and why we treat insulation as a testable, verifiable property.
How to fix it: Check the electrode face first — if it’s mushroomed, dress or replace before touching parameters. Then verify nothing is shunting (insulating parts intact, no accidental contact paths). Only then adjust current or time upward from a clean baseline. Raising current to compensate for a mushroomed electrode is the vicious cycle that cooks electrodes; fix the face, not the knob.
Defect 2: Expulsion (Weld Spatter)
Expulsion is molten metal ejected from the weld — the sparks and spatter of an overdriven joint. It’s not just messy: expulsion occurs when heat input exceeds what the joint can contain, typically from excessive current, insufficient electrode force, or prolonged weld time, and the ejected metal reduces nugget integrity, deepens surface indentation, and can leave voids in the weld.
What causes it:
- Too much heat — current too high or time too long for the joint.
- Too little force — the electrodes aren’t containing the molten pool, so it escapes. Force is the lid on the pot.
- Surface contamination and poor fit-up — oil, rust, coatings, and gaps change contact resistance unpredictably, creating local hot spots that spit.
- Worn electrodes destabilizing the process — a schedule that ran cleanly with fresh electrodes drifts toward expulsion as faces degrade and contact conditions shift.
How to fix it: Confirm force is adequate before cutting current — low force is the underrated cause. Clean up surface condition and fit where possible. Then bring heat input down from a verified-clean setup. And note the diagnostic hint: expulsion that appears gradually on a stable line often signals electrode-face degradation rather than a parameter that changed.
Defect 3: Excessive Indentation
Indentation — the electrode’s imprint pressed into the part — is normal in small amounts, but excessive indentation damages the surface, can violate part specifications (especially on cosmetic or coated parts), and weakens the section at the weld.
What causes it:
- Too much heat plus too much force — an over-soft, overheated weld zone gets crushed deep by heavy electrode force.
- Prolonged weld or hold under force — more time for the softened metal to yield.
- Expulsion — metal ejected from the joint leaves the surface sunken; deep indentation is often expulsion’s visible footprint.
- Degraded electrode geometry — a deformed face presses an irregular, deeper imprint than a correct face would.
How to fix it: Reduce heat input and force back toward what the joint actually needs; verify the electrode face geometry is correct (dress if not); and if expulsion is present, fix that first — the indentation often improves with it.
Defect 4: Electrode Sticking
Sticking — the electrode adhering to the workpiece — interrupts production, damages surfaces, and accelerates electrode wear. Each stick pulls material between electrode and part, roughening the face and making the next stick more likely.
What causes it:
- Overheating at the contact — too much current or a hot, poorly cooled electrode welds itself lightly to the work.
- Contaminated or coated surfaces — coatings (zinc especially) alloy with the copper face and promote adhesion.
- Degraded electrode face — a rough, alloyed, or mushroomed face sticks more readily than a clean one.
- In nut welding, the specific mechanisms we covered separately — our article on why nut welding electrodes stick goes deep on that application’s sticking chain, including the shunting connection.
How to fix it: Restore the electrode face (dress or replace), verify cooling is genuinely adequate, and moderate heat input. On coated materials, accept that more frequent dressing is part of the deal, and consider whether the electrode material suits the coating.
Table 1 — The Four Defects at a Glance
| Defect | Most Common Causes | First Fixes |
|---|---|---|
| Weak / undersized nugget | Low heat, high force, mushroomed face, shunting | Dress face; check insulation; then adjust heat |
| Expulsion | Excess heat, low force, dirty surface, worn face | Verify force; clean surface; reduce heat |
| Excessive indentation | Excess heat + force, long times, expulsion | Reduce heat/force; fix face; fix expulsion |
| Electrode sticking | Overheating, coatings, degraded face | Restore face; verify cooling; moderate heat |
Notice how often “electrode face” and “heat” appear in the fix column — that’s not a coincidence, and it’s the key to the diagnostic approach below.
How to Diagnose: Start With the Electrode, Not the Knob
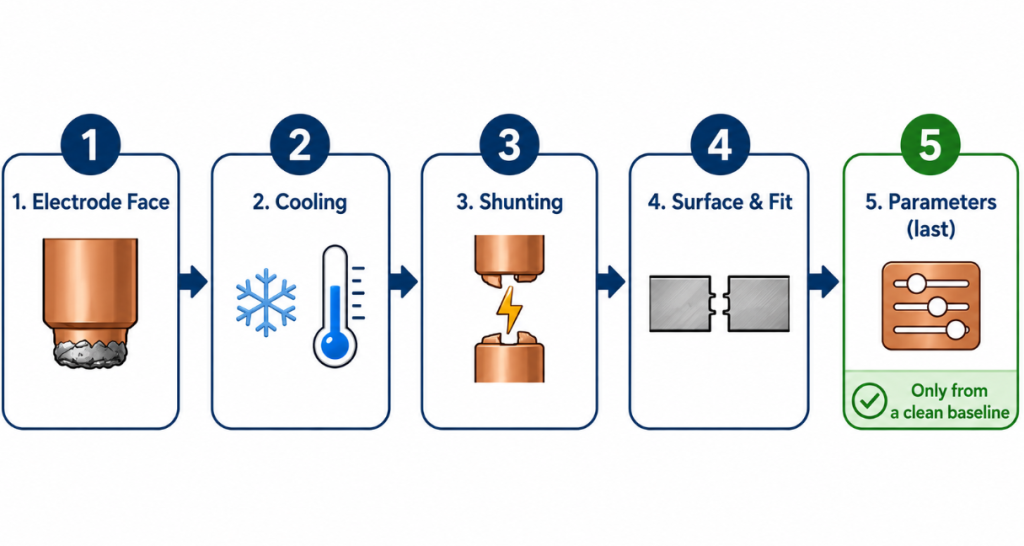
When a defect appears, the instinct is to adjust parameters — and it’s usually the wrong first move. The reason: on a line that was welding well, something changed, and the most common silent changes are physical, not settings. The electrode face wore. Cooling degraded. A surface condition shifted. An insulating part failed. Adjusting current to compensate treats the symptom while the cause keeps worsening.
The diagnostic order that works:
1. Look at the electrode face. Mushroomed, pitted, alloyed, or deformed faces explain weak welds, expulsion drift, indentation, and sticking all at once. If the face is degraded, dress or replace it and re-evaluate before changing anything else.
2. Verify cooling. If electrodes are running hot — degrading fast, sticking, softening — check that cooling water actually flows adequately and reaches the tip. The invisible cooling failures we detailed in the cooling article produce defects that look like parameter problems.
3. Check for shunting. Weak welds with normal-looking settings point at current leaking around the joint — inspect insulating locating parts and look for unintended contact paths.
4. Inspect surface condition and fit. Oil, rust, coating variation, and gaps make results inconsistent and spatter-prone.
5. Only then, adjust parameters — from a clean baseline. With a good face, real cooling, no shunting, and decent surfaces, parameter adjustments are meaningful. Without those, you’re tuning a moving target.
One more preventive layer sits underneath all five steps: the quality of the consumable parts themselves. Consistent electrodes with correct material and geometry, and locating parts whose insulation is genuinely reliable batch after batch, remove whole categories of defect at the source — an electrode that holds its face longer drifts less, and an insulating part that never fails never shunts. Diagnosis fixes defects; consistent parts prevent a share of them from ever appearing.
Table 2 — Symptom → Where to Look First
| Symptom Pattern | Look First At |
|---|---|
| Quality drifted gradually on a stable line | Electrode face wear / mushrooming |
| One gun worse than identical neighbors | That gun’s cooling circuit |
| Weak welds, settings look right | Shunting / insulation failure |
| Inconsistent, scattered results | Surface condition and fit-up |
| Problems from day one of a new setup | Parameters and alignment |
The pattern of the symptom tells you where the cause likely lives — gradual drift means wear, single-gun means cooling, “looks right but weak” means shunting. Reading the pattern saves hours of blind adjustment.
Real Cases: Defects Traced to Their Causes
Case 1 — Weak welds traced to electrode wear. A customer fighting undersized welds had been raising current to compensate — the vicious cycle. The actual cause was mushroomed electrode faces: the spread face had dropped current density below what the joint needed. Restoring the face geometry (and a proper dressing routine) fixed the welds at the original, correct parameters.
Case 2 — Defects traced to shunting. A customer’s welds were coming out weak despite settings that had always worked. The cause was current shunting through a failed insulating path — the joint wasn’t receiving full current. Restoring proper insulation returned the welds to strength, with no parameter changes needed.
Case 3 — Right parts and adjustment resolved the defect. A customer with persistent quality problems needed both a component correction and a modest process adjustment; with the right parts in place and the process reset from a clean baseline, the defect disappeared. The lesson mirrored this whole article: fix the physical causes first, then tune.
Fix the Cause, Not the Symptom
The four common defects — weak nuggets, expulsion, deep indentation, sticking — all trace back to the same six drivers: parameters, electrode state, cooling, shunting, surface condition, and alignment. The productive habit is diagnostic, not reactive: read the symptom pattern, check the physical causes in order (face, cooling, insulation, surface), and only then adjust parameters from a clean baseline. Chasing defects with the current knob treats symptoms while the cause compounds; tracing the cause fixes the weld and usually saves electrodes too.
If you’re fighting a persistent defect, tell us what you’re seeing — the defect, the pattern (gradual or sudden, one gun or all), your material, and your electrode setup. We can help you trace the likely cause and supply what fixes it, whether that’s copper spot welding electrodes in the right material and geometry, properly insulating locating parts, or simply a pointer at the maintenance issue behind the symptom. Good welds come from sound causes — let’s find yours.
References
Xiris — Resistance Spot Welding Defects: Types, Causes, and How to Prevent Them: https://blog.xiris.com/blog/resistance-spot-welding-defects-types-causes-and-how-to-prevent-them
AMPCO Academy — Understanding Weld Defects and How to Prevent Them: https://academy.ampcometal.com/understanding-weld-defects-and-how-to-prevent-them
FSM Direct — Troubleshooting Spot, Seam and Projection Welding: https://fsmdirect.com/troubleshooting-spot-seam-and-projection-welding/
Share This Article
Latest Articles
October 20, 2026
October 20, 2026
October 20, 2026
October 20, 2026
October 20, 2026

October 20, 2026
October 20, 2026
October 20, 2026