Nut Feeding Systems for Resistance Welding: How They Work and How to Choose

A nut feeding system is what turns projection nut welding from a slow, manual, hand-placed operation into a fast, automatic, repeatable one. Instead of an operator picking up each weld nut and placing it on the electrode by hand — slow, tiring, and a real injury risk with the electrode closing nearby — a nut feeder automatically selects nuts, orients them correctly, and delivers each one to the welding position, ready to weld. The result is higher throughput, less labor, consistent nut positioning, and a safer operation. This guide explains how a nut feeder works, its main parts, how to choose one for your nuts and line, and the practical considerations that matter — focused on the feeder as the piece of equipment it is.
Nut feeding pairs naturally with the electrode side of nut welding — our guide to nut welding electrode assemblies covers the covers, holders, and locating pins the feeder delivers nuts to. Here the subject is the feeder itself.
How a Nut Feeder Works
The core job of a nut feeder is simple to state and clever in execution: take a bulk pile of loose nuts and deliver them one at a time, correctly oriented, to the exact spot where welding happens. It does this through a sequence of stages.
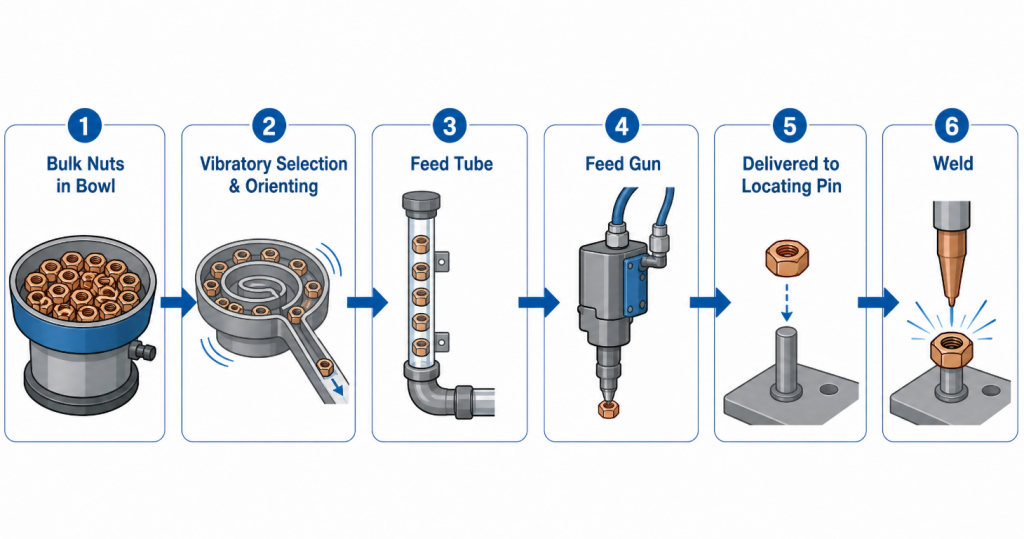
Vibratory bowl selection. Loose nuts are loaded in bulk into a vibrating bowl. The bowl vibrates, which drives the nuts to move along a pre-set track around and up the bowl, and along the way the track screens the nuts — only those correctly oriented and of the right size continue, while others fall back to try again. This vibratory selection is how the system turns a random pile into a stream of correctly-oriented nuts. Automatic feeding systems commonly use vibratory bowls, feed tracks, or rotary systems to align and deliver nuts, ensuring proper alignment with the welding electrodes.
The bowl track is the clever heart of this. It’s shaped so that a nut only passes if it sits the right way — correct face up, correctly aligned — and any nut that arrives wrong is nudged off the track back into the bowl to circulate and try again. This means the bowl doesn’t just move nuts; it sorts them by orientation, continuously, using nothing but vibration and geometry. Because that track geometry is specific to the nut, the bowl is tooled to the particular nut it feeds — which is what lets it select that nut reliably, and also why a bowl built for one nut is set up for that nut rather than being universal.
Delivery through the feed line. The selected, oriented nuts pass into a feed track or delivery tube that carries them from the bowl to the welding station. This feed line keeps the nuts in order and moving toward the gun.
The feed gun and delivery to the locating pin. At the welding station, a feed gun (with an internal ejector/push rod) takes each nut and delivers it precisely onto the locating pin of the welding electrode — the pin passing through the nut’s thread to center it. Once the nut is seated on the pin, the feed rod retracts automatically, clearing the way, and the welder closes and makes the weld. In one common arrangement, the sorted nuts are delivered to the positioning pin by the delivery gun, then the rod withdraws for welding.
Synchronization with the welder. The whole sequence is timed with the welding machine: feed the nut, retract, weld, then feed the next — the feeder and welder working in a coordinated cycle. This synchronization is what makes the automated line run smoothly, each nut arriving just when the welder is ready for it.
The elegance is in the orchestration: bulk nuts in one end, a correctly-placed, ready-to-weld nut on the electrode at the other, automatically and repeatably, cycle after cycle.
Table 1 — Nut Feeder: Main Parts and Their Jobs
| Part | Job |
|---|---|
| Vibrating bowl | Selects and orients nuts from bulk |
| Feed track / delivery tube | Carries oriented nuts to the station |
| Feed gun + ejector rod | Delivers each nut onto the locating pin |
| Distributor / control | Times and directs the feed |
| Locating pin (on electrode) | Receives and centers the nut for welding |
Reading down the parts traces the nut’s journey — bowl to track to gun to pin — and shows how each stage hands off to the next. A feeder is this chain working in concert.
Why Use a Nut Feeder: The Benefits
The case for a nut feeder comes down to what automation buys over hand-feeding, and the benefits are concrete.
More throughput through automatic feeding. Automatic feeding is far faster than placing nuts by hand — the feeder delivers nut after nut without the pauses manual placement requires, raising welding throughput. For any volume of nut welding, that speed compounds across a shift into meaningfully higher output.
Less labor. The feeder removes the manual task of placing each nut, freeing the operator and reducing the labor the operation requires. One person can oversee an automated feed rather than hand-placing every nut, which changes the economics of nut welding at volume.
Consistent nut positioning. Because the feeder delivers each nut the same way onto the locating pin, positioning is consistent from weld to weld — the machine doesn’t tire or vary the way hand placement does. That consistency feeds directly into weld quality, since a consistently-placed nut welds consistently.
A safer operation. Hand-placing nuts means putting fingers near an electrode that closes with force — a genuine hazard. An automatic feeder delivers the nut mechanically, removing the operator’s hand from the danger zone and the risk of being caught by the electrode. Safety alone justifies automation for many shops.
Supports M4–M12 and a range of nuts. A feeder set up for your nut sizes handles the common M4 through M12 range and beyond, feeding the nuts your production uses. Matched to your nuts, it delivers them reliably across your size range.
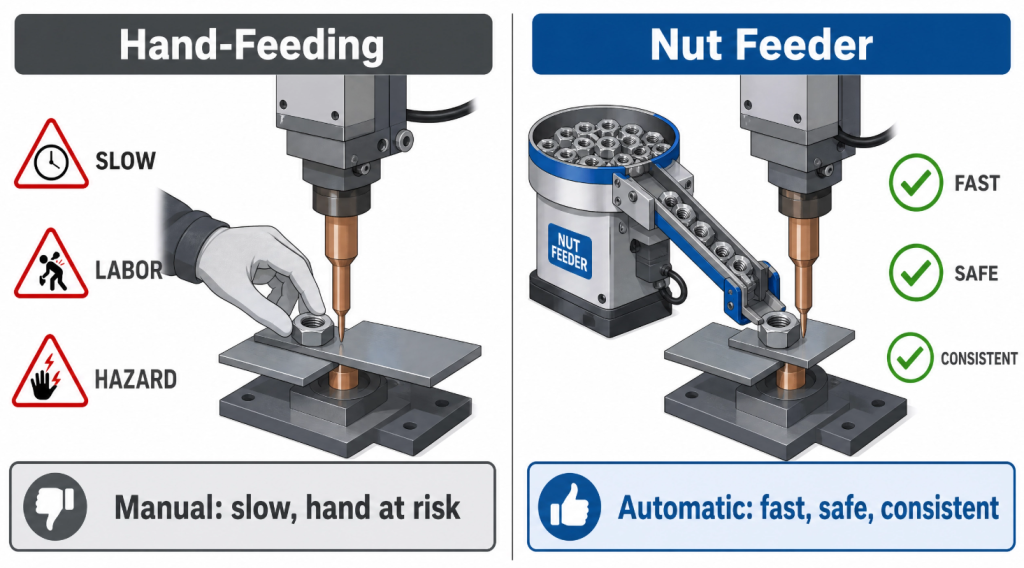
Table 2 — Hand-Feeding vs Automatic Nut Feeder
| Aspect | Hand-Feeding | Nut Feeder |
|---|---|---|
| Throughput | Limited by manual pace | High — continuous feed |
| Labor | An operator per station, placing each nut | Oversight, not placement |
| Positioning consistency | Varies with the operator | Uniform every cycle |
| Safety | Hand near closing electrode | Hand out of the danger zone |
| Volume suitability | Low volume only | Built for production volume |
The columns make the automation case plainly: for anything beyond low volume, the feeder wins on throughput, labor, consistency, and safety together. Hand-feeding survives only where volume is genuinely small.
Choosing a Nut Feeder for Your Application
Selecting a feeder is mostly about matching it to your nuts and your line, across a few clear considerations.
Matched to your nut — size, type, and thread. This is the first-order specification. The bowl, track, and tooling have to suit your specific nut — its size (M4–M12 and beyond), type, and shape — because the vibratory selection and delivery are geometry-specific. A feeder is set up around the nut it feeds, which is why feeders are built to the customer’s nut rather than sold one-size-fits-all. This is also the honest limitation of dedicated feeders: a bowl and gun tooled for one nut don’t simply switch to a very different nut without change-over or retooling, so it’s important to specify the nuts you actually run.
Integration with your welding machine. The feeder has to integrate and synchronize with your projection welder — feeding and retracting in time with the weld cycle. A feeder matched to your machine forms a coordinated line; one that doesn’t fit the machine can’t synchronize properly. Specifying your welder is part of specifying the feeder.
Delivery to the locating pin. The feed gun has to deliver nuts accurately onto your electrode’s locating pin — so the feeder and the electrode assembly have to work together as a system. This is exactly why supplying the feeder and the matching nut electrode together makes sense: the delivery and the receiving pin are two halves of one accurate placement.
Feed rate for your production. The feeder should keep up with your welding cycle — delivering nuts at least as fast as you weld them, so the feeder never bottlenecks the line. Matching feed rate to your production rate keeps the whole operation flowing.
Customization to your nut and line. Because nuts and production lines vary so widely, feeders are frequently built to the specific application. We design and build nut feeding to match the customer’s nut and line — the practical way to get a feeder that reliably selects and delivers your particular nut to your particular welder.
Table 3 — Nut Feeder Selection Factors
| Factor | Why It Matters | Getting It Wrong Means |
|---|---|---|
| Matched to your nut | Selection & delivery are geometry-specific | Won’t feed reliably; jams |
| Machine integration | Must synchronize with the weld cycle | Feeder and welder out of step |
| Delivery to locating pin | Feeder + electrode are one system | Inaccurate nut placement |
| Feed rate | Must keep up with welding | Feeder bottlenecks the line |
| Custom to nut & line | Nuts and lines vary widely | Generic feeder fits poorly |
The five factors all point one direction: a nut feeder is a made-to-fit piece of equipment, specified around your nut, your machine, and your rate — which is what makes it reliable in production.
Practical Considerations Customers Ask About
A few real-world points come up whenever customers plan a nut feeder, each tied to how the equipment behaves in production.
Change-over between different nuts. Because a dedicated vibratory feeder is tooled to a specific nut, running a very different nut generally means change-over or retooling — a new or adjusted bowl and gun. This is the practical trade-off of dedicated feeding: excellent, reliable feeding of the nut it’s built for, at the cost of easy switching to a very different one. Shops that run a few nut types plan for this; it’s why specifying your actual nut range up front matters.
Synchronization with the weld cycle. Keeping the feed and the weld in step is essential — a feeder out of sync with the welder disrupts the cycle. Proper integration and timing keep feed-retract-weld running smoothly, which is part of setting the feeder up correctly with the machine.
Nut orientation. The vibratory selection has to reliably orient the nuts — get the right face and alignment — so every delivered nut is correctly presented. A well-designed bowl and track for your nut is what ensures correct orientation, and it’s part of why the feeder is built around the specific nut.
Jamming and reliable feeding. Reliable, jam-free feeding is what customers most want, and it comes from a feeder properly matched to the nut — correct bowl, track, and tooling for that nut’s size and shape. A feeder built to the nut feeds it reliably; a poor match is what causes jams. This, again, is why made-to-nut design matters.
Nut Feeder and Electrode: One System
The most useful way to think about nut feeding is as half of a system whose other half is the nut welding electrode. The feeder selects, orients, and delivers the nut; the electrode assembly — body, cover, and locating pin — receives it and welds it. The feed gun delivering the nut and the locating pin receiving it have to work together for accurate placement, which means the two are best specified and supplied together.
This is where being able to provide the whole set matters: the nut feeder, the matching nut welding electrode, and the locating pin, designed to work together for your nut. A feeder that delivers accurately to an electrode built to receive that delivery gives you the reliable, automatic nut welding the whole setup is for. Specified as a system around your nut, the parts fit — and nut welding runs fast, consistent, and hands-free. Sourcing the feeder and the electrode from one place, built to the same nut, avoids the mismatch that comes from piecing together a feeder and an electrode that were never designed to work as a pair.
Match the Feeder to Your Nut and Line
A nut feeding system automates projection nut welding — selecting nuts from bulk, orienting them, and delivering each one to the welding position — for higher throughput, less labor, consistent positioning, and a safer operation than hand-feeding. Choosing one is about matching it to your nut (size, type, thread), your welding machine, and your production rate, and because those vary so widely, feeders are built to the specific application. Best of all is specifying the feeder together with the matching nut electrode and locating pin, so the delivery and the welding are one accurate, coordinated system.
If you weld nuts and want to automate, tell us your nut sizes and types (M4–M12 or beyond), your welding machine, and your production rate, and we’ll help you specify a nut feeding system — and the matching nut welding electrodes and locating pins — built for your nut and line. See our nut feeding system for resistance welding and our M4–M12 nut feeder equipment, or send us your nut and line details and let’s automate your nut welding the right and safe way.
References
Rosen Welding — Automatic Nut Feeder (safety and efficiency): https://rosenweld.com/automatic-nut-feeder/
Agera — Introduction to Automatic Feeding Systems for Nut Projection Welding Machines: https://www.agerawelder.com/news/introduction-to-automatic-feeding-systems-for-nut-projection-welding-machines/
Agera — How to Feed and Position Nuts for Projection Welding: https://resistance-welding.com/how-to-feed-and-position-nuts-for-projection-welding/
Share This Article
Latest Articles
October 20, 2026
October 20, 2026
October 20, 2026
October 20, 2026
October 20, 2026
October 20, 2026
October 20, 2026
October 20, 2026