Pneumatic vs Manual Tip Dressers: Which to Choose

Once you’ve accepted that electrode tips need regular dressing, the next question is what to dress them with — and the main choice is between a pneumatic (air-powered) tip dresser and a manual one. Neither is universally better; they suit different production realities. A pneumatic dresser brings speed and consistency for high-volume, fast-cycle work; a manual dresser brings portability, flexibility, and lower cost for smaller-scale operations. This article walks through the difference, when each makes sense, and how to choose the right dressing tool for your situation — so you match the tool to your production rather than over- or under-buying.
This is the tooling companion to our guides on how often to dress electrode caps and the broader role of dressing in extending electrode life. Here the focus is the dresser itself — the tool that does the job.
Why the Dressing Tool Matters
Before comparing types, it’s worth being clear on what a tip dresser does and why the choice matters. Repeated exposure to high temperature and pressure alters a copper electrode’s tip geometry over a number of welds — the face spreads, mushrooms, and loses the shape that produces good welds. Tip dressing resets the electrode to its correct shape, restoring the geometry that consistent welds depend on. As tip-dressing specialists explain, dressing resets the electrode shape to meet precise specifications, because repeated heat and pressure continuously alter the tip geometry. Even with proper weld parameters and water cooling, copper electrodes wear, so dressing is not optional maintenance — it’s how you hold weld quality over a production run.
The tool you dress with shapes how well and how consistently that resetting happens. A good dresser returns worn electrodes to their original shape to improve quality, reduce downtime, and get more use out of the electrode, and proper tip dressing can solve a range of weld-quality problems — undersized or stuck welds, non-round welds, poor appearance, excessive indentation. The dresser is the tool that keeps the electrode doing its job, and choosing the right kind is part of running an efficient welding operation. The choice between pneumatic and manual is really a choice about how your dressing fits your production.
Pneumatic Tip Dressers: Speed and Consistency
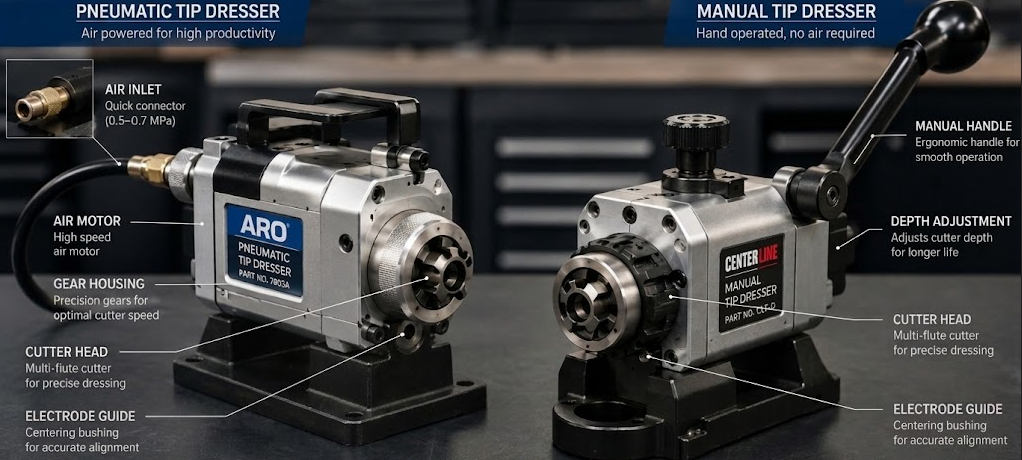
A pneumatic tip dresser is powered by compressed air, which spins the cutter to dress the electrode. Its strengths suit higher-volume, faster-paced production.
Fast dressing that saves labor. A pneumatic dresser cuts and reshapes quickly — dressing an electrode with one is, as the tools are often described, about as simple and fast as sharpening a pencil. That speed saves labor: the dressing is done in moments and with little physical effort, where a manual approach takes more time and operator work. For an operation dressing frequently, that time and labor saving adds up across a shift.
Consistency across high volume. Because a pneumatic dresser is powered and uniform in its action, it produces consistent dressing cut after cut — important when you’re dressing many electrodes and need each one reset to the same correct geometry. This consistency is exactly what high-volume production needs: the powered tool removes operator-to-operator variability, so the thousandth dress matches the first.
Suited to high-cycle, high-volume lines. Putting those together, pneumatic dressers fit fast-cycle, high-throughput production where dressing happens often and consistency matters. Where the line runs hard and the dressing is frequent, the speed, low labor, and uniformity of a pneumatic dresser make it the practical choice. Pneumatic and powered dressers are widely used precisely to extend electrode life, reduce downtime, and lower costs on demanding production, returning worn electrodes to their original shape across high volume.
The pneumatic dresser, in short, is the tool for when dressing volume is high and consistency and speed are priorities — the high-production answer.
Manual Tip Dressers: Portability, Flexibility, and Lower Cost
A manual tip dresser is operated by hand, and its strengths suit smaller-scale, more flexible, or budget-conscious operations.
Portable and flexible. A manual dresser is portable and flexible — it can be used wherever it’s needed without a compressed-air supply, and it’s simple to deploy for occasional or varied dressing. For situations where flexibility and portability matter more than raw speed, a hand tool is convenient in a way a powered unit tied to an air line is not. As tooling suppliers frame the distinction, the manual model is ideal for quick and versatile interventions while the pneumatic version provides maximum efficiency for intensive use — a clean summary of the two tools’ complementary niches.
Lower cost. A manual dresser costs less than a pneumatic one, which matters for budget-conscious operations or those that don’t need the throughput of a powered tool. Where the dressing volume doesn’t justify the expense of a pneumatic unit, the lower cost of a manual dresser is a real advantage — you’re not paying for capacity you won’t use.
Well-suited to lower-volume, smaller-batch work. Manual dressers fit lower-production and small-batch applications where dressing happens less often. When you’re not dressing constantly, the speed of a pneumatic dresser is less essential, and a manual tool handles the lower volume perfectly well at lower cost and with more flexibility. Many manual dressers also shape upper and lower caps simultaneously and help ensure electrode face alignment, so they don’t sacrifice dressing quality — they trade speed and automation for cost and flexibility.
The manual dresser is the tool for lower-volume, budget-conscious, or flexible work — the small-scale and versatile answer.
Table 1 — Pneumatic vs Manual Tip Dressers
| Factor | Pneumatic Dresser | Manual Dresser |
|---|---|---|
| Speed | Fast — like sharpening a pencil | Slower; more operator effort |
| Labor | Low — powered | Higher — hand-operated |
| Consistency | High — uniform powered action | Good, but operator-dependent |
| Best volume | High-cycle, high-volume | Lower-volume, small-batch |
| Portability | Tied to air supply | Portable, flexible |
| Cost | Higher | Lower |
| Power source | Compressed air | Hand-operated |
The columns lay out the trade: pneumatic buys speed, low labor, and consistency at higher cost and with an air-supply requirement; manual buys portability, flexibility, and low cost at the price of speed and some consistency. Your production volume is what tips the balance.
How to Choose the Right Dressing Tool
The decision comes down to matching the tool to your production realities, across a few clear factors.
Production volume and cycle rate. This is the biggest factor. High-volume, high-cycle production favors a pneumatic dresser, because the speed, low labor, and consistency pay off when dressing happens often. Lower-volume or small-batch work is well-served by a manual dresser, where the dressing is less frequent and the speed is less critical. Start with how much dressing you actually do.
Automation. An automated or robotic production line generally calls for powered dressing integrated into the process — a pneumatic or robotic dresser fits an automated line in a way a hand tool cannot. A manual operation, by contrast, is naturally suited to a manual dresser. Match the dresser to how automated your line is. On a robotic line specifically, the weld gun is typically moved to a fixed dresser station periodically, so the dressing tool has to be powered and positioned for the robot to use it automatically — a manual hand tool simply doesn’t fit that workflow. Conversely, a manual welding setup where an operator dresses by hand gains nothing from the cost and air-supply requirement of a pneumatic unit. The degree of automation in your line is therefore one of the clearest signals pointing to one dresser type or the other.
Budget. Where budget is a primary constraint and the production doesn’t demand a powered tool, a manual dresser delivers dressing capability at lower cost. There’s no need to invest in pneumatic throughput you won’t use — but equally, on a high-volume line, a pneumatic dresser’s efficiency justifies its cost.
Electrode shape and quantity. The electrodes themselves matter too — their shape and the number you’re dressing feed into both the dresser choice and, importantly, the cutter selection. Different electrode geometries need the right cutter blade profile to dress correctly, which is a consideration alongside the dresser type.
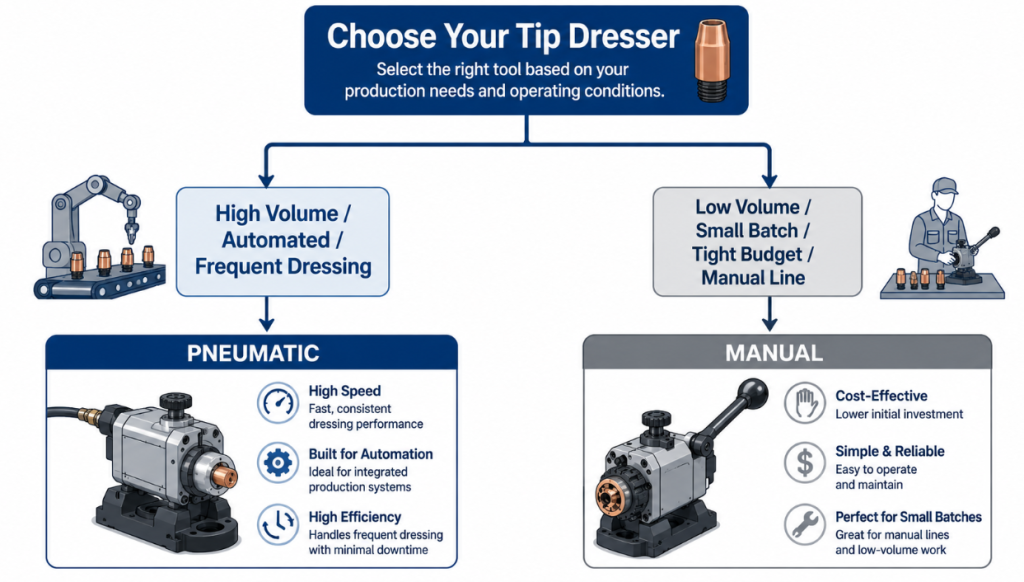
Table 2 — Matching Dresser to Your Operation
| Your Situation | Better Choice |
|---|---|
| High-volume, fast-cycle line | Pneumatic |
| Lower-volume, small-batch | Manual |
| Automated / robotic line | Pneumatic / powered |
| Manual welding operation | Manual |
| Tight budget, modest volume | Manual |
| Frequent dressing, consistency critical | Pneumatic |
Reading the table to your own operation usually points clearly to one or the other — and in some shops, the answer is both: a pneumatic dresser for the main high-volume work and a manual one for flexibility or as a backup.
Cutters and Blades: The Part That Actually Cuts
Whichever dresser type you choose, the cutter blade is what actually shapes the electrode, and it deserves attention in its own right. A tip dresser system consists of the dresser tool, the cutter blade, and the cutter holder, and the blade is the wear part that does the cutting. Matching the blade to your electrode is essential: different electrode shapes and sizes require the appropriate cutter blade profile to dress them to the correct geometry.
A good range of cutter blade options — standard profiles for common electrodes, and custom cutters made to a specific electrode drawing — is what lets a dressing system handle whatever electrodes you run. The blade has to match the electrode’s shape so the dressing restores the right geometry, and for unusual or custom electrode shapes, a custom cutter ground to the electrode profile is the way to dress them correctly. This is why we supply both standard cutter blades and custom cutters made to a customer’s electrode drawing — the dresser is only as good as the blade matching your electrode, and the blade has to fit what you actually weld with.
It’s worth understanding why the cutter, not the dresser, is often the more application-specific choice. The dresser type — pneumatic or manual — is determined mostly by your production volume and is fairly general: many shops with similar volumes use similar dressers. The cutter blade, by contrast, has to match your specific electrode geometry, and electrode shapes vary widely — pointed, domed, flat, truncated, radiused, and various specialized profiles for particular applications. A cutter ground for one electrode shape won’t correctly dress a different shape, so the blade is where the dressing system meets your particular electrodes. This is also why cutter blades are consumable and selected per application: they’re the interface between a general-purpose dresser and your specific electrode, and getting the blade profile right is what ensures the dressed electrode comes out with the geometry your welds need. A dresser with the wrong cutter dresses to the wrong shape, however good the dresser itself is.
Real Cases: Matching the Tool to the Job
Three customer situations show dresser and cutter choice in practice.
Case 1 — Pneumatic dresser improved efficiency and consistency. A customer dressing at higher volume switched to a pneumatic tip dresser and saw both efficiency and consistency improve — the powered tool dressed faster, with less labor, and produced more uniform results across the many electrodes they were dressing. The move matched the tool to a production volume that justified it, and the speed and consistency paid off.
Case 2 — Custom cutter to electrode shape. A customer running a particular electrode shape needed a cutter that matched it. We made a custom tip dresser cutter to their electrode drawing, producing a blade that dressed their specific electrode geometry correctly — the customization that gets the right shape restored on a non-standard electrode.
Case 3 — Manual tool right for small-batch work. A customer with lower-volume, small-batch production found a manual dressing tool was the right fit — it handled their less-frequent dressing well, at lower cost and with the flexibility their operation valued, without paying for pneumatic throughput they didn’t need. The manual tool matched their actual production reality.
The thread across all three: the right tool is the one that matches your volume, your electrodes, and your budget — not the most or least capable tool in the abstract. Each customer got the tool their actual production called for, and in each case matching the tool to the job was what produced the good outcome.
Choosing the Dresser That Fits Your Production
The choice between a pneumatic and a manual tip dresser comes down to your production: pneumatic for high-volume, fast-cycle, automated, or consistency-critical work where speed and uniformity justify the cost; manual for lower-volume, small-batch, budget-conscious, or flexible operations where portability and low cost matter more than throughput. And whichever dresser you choose, the cutter blade matched to your electrode is what actually delivers the dressing — standard or custom-ground to your electrode shape. Matching both the dresser and the cutter to your real production is what gets you efficient, consistent dressing.
We supply the full range — pneumatic and manual tip dressers, standard cutter blades, and custom cutters made to your electrode drawing — so we can help you match the tool to your operation rather than sell you more or less than you need. Tell us your production volume, whether your line is automated, your electrode shapes, and your budget, and we’ll help you choose the right dressing setup for your operation. Browse our cap tip repair tools, or send us your situation and let us help you dress your electrodes the right way.
Share This Article
Latest Articles
October 19, 2026
October 19, 2026
October 19, 2026
October 19, 2026
October 19, 2026
October 19, 2026
October 19, 2026
October 19, 2026